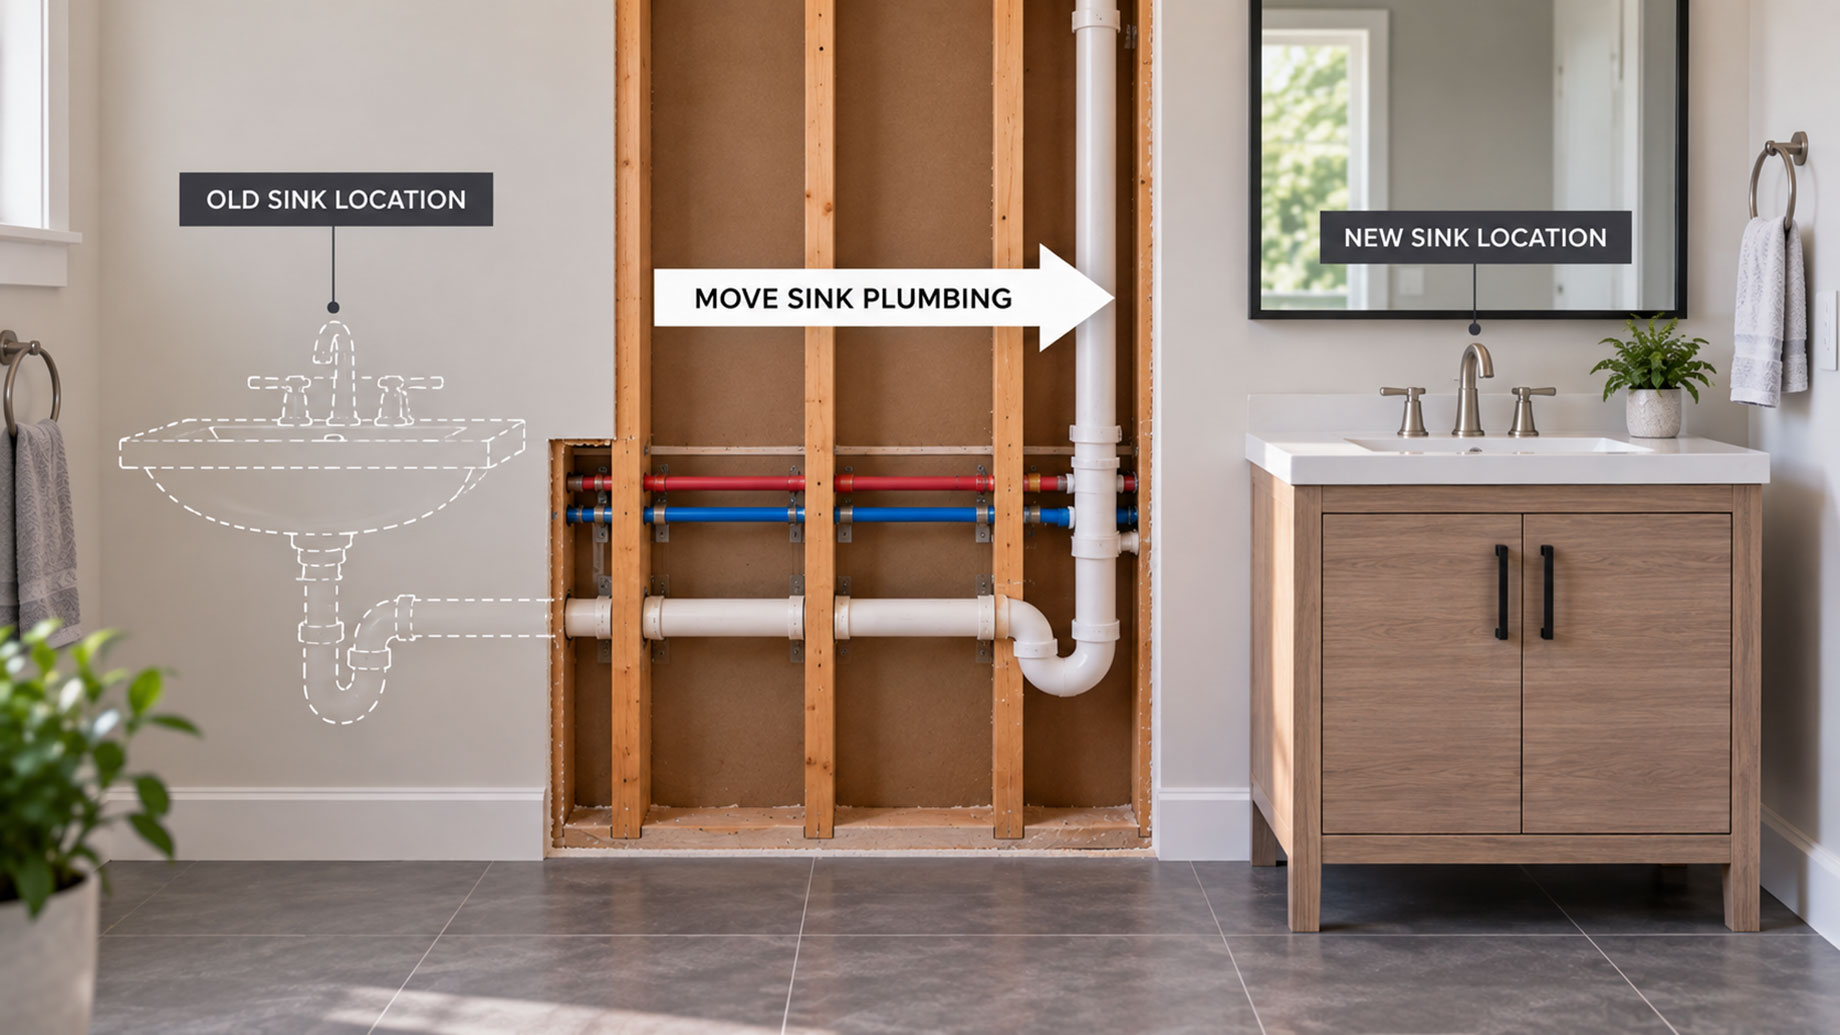
Relocating a bathroom sink is one of the most common upgrades homeowners take on during a bathroom remodel — and it’s also one of the most misunderstood. Whether you’re shifting the vanity a few inches to the left to make room for a new shower enclosure, or moving the basin to an entirely different wall for a better layout, learning how to move bathroom sink plumbing properly is the difference between a clean, long-lasting installation and a slow leak inside your wall cavity.
This guide walks you through the planning, tools, regulations, and practical steps involved, along with the mistakes that cost people the most money.
Why Homeowners Move Bathroom Sink Plumbing
Before picking up a pipe wrench, it helps to be clear on the goal. Most sink relocations happen for one of these reasons:
- Better layout flow — moving the basin away from a doorway or radiator
- Fitting a larger vanity or double-basin unit
- Accessibility needs — lowering or raising the sink height for wheelchair users, children, or elderly family members
- Converting a bathroom into a wet room or ensuite
- Repairing water damage and taking the opportunity to improve the layout
Knowing why you’re moving the sink matters, because a 6-inch shift and a 6-foot shift are completely different projects. A small horizontal move can often be handled with flexible supply lines and an extended trap arm. A large move means opening walls, re-routing drain lines, and re-establishing proper fall and venting.
Understanding the Three Systems You’re Moving
A bathroom sink isn’t one connection — it’s three, and each has its own rules.
- Hot and cold water supply lines: These are pressurised, so they can travel almost anywhere — up, down, sideways — as long as they’re well supported and protected from freezing. The hot and cold water pipes must be extended to reach the new sink position. Modern plumbing projects often use materials such as PEX because it is flexible and easier to route through walls, while copper pipes may also be extended but usually require more specialised skills .
- The drain (waste) line: This is the hard part. Waste water moves by gravity, not pressure, which means your new drain run must maintain a consistent downward slope — typically around 1/4 inch of fall per foot of horizontal pipe (roughly 1:40 gradient). Too little slope and water sits in the pipe; too much and water races ahead of solids, leaving residue behind.
- The vent: Every fixture needs air to drain properly. If the sink moves too far from its existing vent stack, you’ll get slow drainage and gurgling noises. Depending on your local rules, you may need to extend the vent, add a new branch vent, or fit an air admittance valve (AAV).
Tools and Materials Checklist
Gathering everything first saves you three trips to the merchant.
Tools:
- Adjustable wrench and basin wrench
- Pipe cutter (or PEX cutter)
- Hacksaw or multi-tool
- Drill with hole saw and spade bits
- Spirit level and tape measure
- Stud finder
- Bucket, towels, and a wet/dry vacuum
- Safety glasses and gloves
Materials:
- PEX or copper pipe and appropriate fittings
- Push-fit or compression connectors (or solder, flux, and torch for copper)
- PVC/ABS waste pipe, elbows, and couplings
- New P-trap and tailpiece
- Pipe solvent cement and primer
- Pipe clips/straps and insulation
- PTFE tape
- Isolation valves
- Patching materials: plasterboard, joint compound, tile adhesive
Step 1: Plan and Mark the New Location
Measure from a fixed reference point — usually a wall corner — and mark the centreline of the new basin. Standard bathroom sink rough-in heights are:
- Drain outlet: 18–20 inches above finished floor
- Supply stubs: 20–22 inches above finished floor, spaced about 8 inches apart
- Basin rim: 31–36 inches above finished floor (32 inches is common; taller “comfort height” vanities sit around 36 inches)
Use a stud finder to locate framing. Ideally, position the new drain within a stud bay you can access. Check what’s on the other side of the wall — an exterior wall means insulation and frost risk, and a wall shared with a bedroom means noise considerations.
Step 2: Check Permits and Building Regulations
This step gets skipped constantly and it shouldn’t. In the UK, notifiable work under Building Regulations Part G (Sanitation, Hot Water Safety and Water Efficiency) and Part H (Drainage and Waste Disposal) may apply, particularly if you’re altering or adding to the soil stack. In the US, most jurisdictions require a permit for relocating drain and vent lines, even though supply-only changes are sometimes exempt.
Unpermitted plumbing work can cause problems when you sell the property, and some home insurance policies will dispute water-damage claims traced to non-compliant DIY work. A quick call to your local building control office costs nothing.
Step 3: Shut Off Water and Drain the Lines
Turn off the local isolation valves if you have them, or the main stopcock if you don’t. Open the taps at the sink — and one tap on a lower floor if possible — to drain residual water. Flip off the electrical circuit for any nearby outlets, lights, or heated mirrors before opening walls.
Step 4: Remove the Old Sink and Expose the Pipework
Disconnect the supply lines at the shut-off valves and unscrew the P-trap slip nuts. Have a bucket ready — trap water is always dirtier than people expect. Remove the basin and vanity.
Now cut open the wall. Score plasterboard with a utility knife and remove it in manageable panels — cutting back to the stud centres on each side makes patching far easier later. If you’re working with a tiled wall, expect to lose tiles; source replacements before you start.
Step 5: Cap or Remove the Old Connections
If the old pipes are no longer needed, cut them back and cap them properly. Never leave an open, uncapped drain stub in a wall — sewer gases will find their way into the room. For abandoned drain branches, cut back to the nearest fitting and install a solvent-welded cap. For supply lines, either cap them or, better, remove the redundant branch back to the tee.
Step 6: Run the New Drain Line
This is where precision pays off:
- Establish your connection point on the existing waste stack or branch line.
- Cut in a sanitary tee (not a standard tee) at the correct height.
- Run horizontal pipe toward the new sink location, maintaining that 1/4-inch-per-foot fall.
- Drill through studs at the appropriate heights — stay within the middle third of the stud depth and never exceed 40% of the stud width for a load-bearing wall. Use metal nail plates to protect the pipe.
- Support horizontal runs every 3–4 feet with pipe clips.
- Install the trap arm stub-out at your marked drain height.
Dry-fit the entire assembly first, mark your alignment, then dismantle and cement it permanently. Solvent cement sets in seconds — there is no adjusting afterwards.
Step 7: Handle the Venting
If the new drain is within the maximum permitted trap-arm distance from the existing vent, you may be able to tie into it directly. If not, options include:
- Extending a branch vent up and over to connect to the main stack above the highest fixture
- Fitting an air admittance valve in an accessible, ventilated location (permitted in many jurisdictions, restricted in others)
- Installing a wet vent — which has strict sizing rules and is best left to a professional
Poor venting is the single most common cause of “my new sink drains slowly and I can’t work out why.”
Step 8: Extend the Water Supply Lines
Route the hot and cold lines to the new position. PEX is the friendliest option for DIYers: it bends around obstacles, requires fewer fittings, and tolerates a minor freeze better than rigid pipe. Keep hot and cold at least a couple of inches apart, or insulate them, to prevent heat transfer.
Install new quarter-turn isolation valves at the stub-outs. Support all pipework with clips so nothing rattles when the taps shut off — that banging noise is water hammer, and it damages joints over time.
Step 9: Pressure Test Before You Close the Wall
Do not skip this. Cap the supply stub-outs, turn the water back on, and leave the system pressurised for at least 30 minutes to a couple of hours. Inspect every joint with a torch and a dry paper towel — a towel will reveal a weep that your eyes miss.
For the drain, plug the trap arm, fill the line with water, and check for seepage. Many building inspectors require a witnessed test at this stage.
Step 10: Adjusting Sink Height (If You’re Raising or Lowering)
If your project is about height rather than position, the fix is often simpler than a full relocation. For example, to raise a low basin, you’ll need a longer pipe piece with the other fittings — add a 45-degree fitting upward, add a comparatively larger pipe piece between the P-trap and the 45-degree fitting depending on the height you require, and join all the parts using a pipe wrench .
Just remember that raising the trap outlet reduces your available fall to the stack, so verify the slope still works before committing.
Step 11: Close Up, Reinstall, and Commission
Patch the plasterboard, tape and fill the joints, then prime and paint or re-tile. Use moisture-resistant (green) board in wet areas.
Reinstall the vanity and basin, connect flexible tap tails to the isolation valves with PTFE-taped or washered joints, and fit the new P-trap. Turn the water on slowly, fill the basin, and release a full basin of water at once — a “slug test” stresses the drain far more than a trickling tap and exposes weak joints immediately. Check under the basin again after 24 hours and after a week.
Common Mistakes That Cost the Most Money
- Insufficient drain slope — the number one cause of recurring clogs
- Ignoring venting — leads to gurgling, slow drains, and siphoned traps that let sewer gas in
- Over-notching studs — weakens the wall structure
- Using a standard tee instead of a sanitary tee on a drain
- No nail plates — one picture hook through a pipe and you have a flood inside a wall
- Closing the wall before testing — you will open it again, and it’ll cost twice
Cost Expectations
| Project Scope | Typical Professional Cost |
|---|---|
| Minor shift (under 12″, same wall) | £150–£400 / 200–500 |
| Same-wall relocation, new drain branch | £400–£900 / 500–1,200 |
| Move to a different wall | £900–£2,000 / 1,200–2,500 |
| Concrete slab or joist alteration | £2,000+ / $2,500+ |
DIY materials generally run £80–£250, but that assumes you don’t need to hire a professional to correct anything.
When to Call a Professional
Handle it yourself if you’re making a short move on an accessible stud wall with easy access to the stack. Call a licensed plumber if:
- The drain sits in a concrete slab or requires cutting joists
- You have cast iron or lead pipework
- The move requires relocating or re-sizing the soil stack
- Your local authority requires licensed work and inspection
- You’re in a flat or apartment where a leak affects neighbours
Frequently Asked Questions
- How far can I move a bathroom sink without moving the drain? Often 12–30 inches, depending on your existing trap-arm length and vent distance. Beyond that, the drain needs relocating.
- Can I use a flexible corrugated trap to reach a moved drain? It’s tempting, but flexible traps trap debris in their ridges and clog far more often. Use rigid pipe and proper fittings wherever possible.
- Do I need to move the vent as well? If the new location exceeds the maximum trap-arm-to-vent distance in your code, yes — or you’ll need an AAV.
- How long does the job take? A simple shift: 2–4 hours. A wall-to-wall relocation: 1–3 days including patching and drying time.
Conclusion
Learning how to move bathroom sink plumbing comes down to respecting three fundamentals: maintain proper drain slope, keep the system properly vented, and test everything thoroughly before you close the wall. Get those right and you’ll have a relocation that performs flawlessly for decades. Rush them, and you’ll be reopening plasterboard within a year.
Plan generously, measure twice, check your local building regulations, and be honest about where your skills end — there’s no shame in doing the demolition and patching yourself while bringing in a licensed plumber for the drain and vent work.
If you’re tackling a bathroom relocation as part of a wider renovation, it’s worth pairing the technical side with good design thinking. Home Comfort Experts is a helpful resource for exactly that — the site publishes practical home design, home decor, and home improvement ideas, covering everything from small-bathroom layout inspiration and vanity styling to material choices, storage solutions, and room-by-room renovation guides. Browsing through their content is a great way to make sure your newly relocated sink doesn’t just work properly, but genuinely improves how the whole room looks and feels.