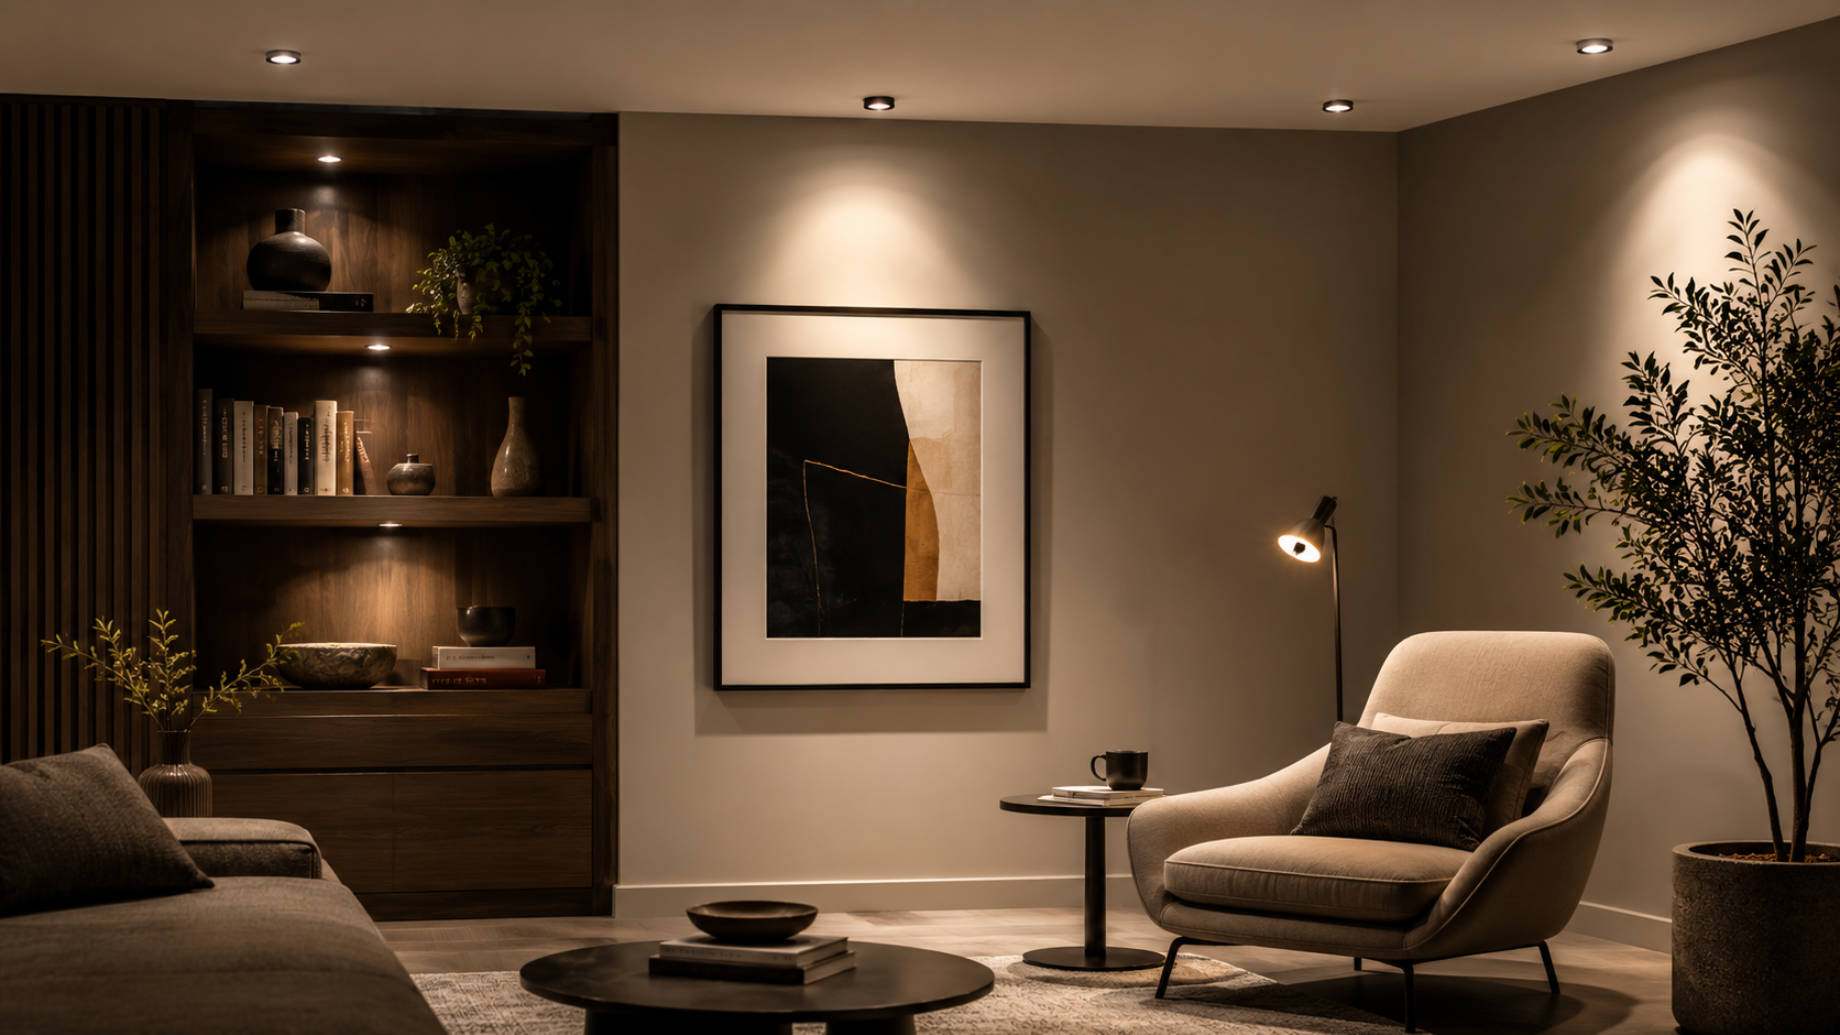
Focused light is not a luxury feature. It is a practical tool that shapes how a room works and how it feels. LED spot lights excel at this because they concentrate output into a controlled beam, making it easier to highlight what matters without flooding everything else. In homes, that often means artwork, shelving, kitchen work zones, or a reading chair that needs crisp visibility. In commercial spaces, it can mean product displays, signage, or task areas where accuracy and comfort matter.
The “right” spotlight is less about raw brightness and more about intent. A narrow beam can make a sculpture look dramatic but may leave surrounding surfaces dim and uneven. A wider beam can create smoother coverage but may reduce the sense of visual emphasis. Good design starts with asking what you want the light to do, then matching beam characteristics and mounting strategy to that job. When the goal is focused illumination, the spotlight becomes a quiet form of direction, steering attention through the room.
LED technology has shifted the equation in a way consumers sometimes underestimate. Lower heat output reduces risk around sensitive materials and makes fixtures more comfortable in tight spaces. Longer lifetimes reduce the penalty for choosing specialized lamps or hard-to-reach installations. And modern optics, lenses, and reflectors have improved beam consistency, which is crucial if you want the light to look intentional rather than accidental. When you select LED spot lights thoughtfully, you end up buying control, not just light.
Start With the Plan: What You Are Lighting and Why
Focused illumination usually serves one of two roles: helping you see or helping you notice. Task lighting is about visibility, contrast, and fatigue reduction, such as under-cabinet spots that brighten a cutting board or a desk surface. Accent lighting is about emphasis, such as drawing the eye to a painting, a textured wall, or a product display. The fixtures can look similar, but the required beam angles, brightness, and color quality often differ. If you buy without defining the role, you may end up with lighting that is too harsh for comfort or too weak for impact.
The best results come from layering, which is a concept that sounds decorative but is actually highly practical. Ambient light sets a baseline, task light does the work, and accent light tells the story. LED spot lights typically belong to the second and third layers, where precision matters most. When layered correctly, a room reads as balanced even if the spotlight itself is intense, because surrounding light prevents the stark “stage” look that can make spaces feel unfinished. People often blame the bulb when the real issue is that the lighting plan is incomplete.
Once the job is clear, the shopping process becomes less about scrolling and more about comparing specs that determine performance. You want to weigh beam angles, confirm whether a fixture suits track, recessed, or surface mounting, and check dimming compatibility before anything goes into a ceiling. That is easier when one supplier covers both fixtures and the electrical essentials that support them. BuyRite Electric has played that role since 1986, pairing top brands with sharp pricing and dependable service. Its on-site selection of aimable LED spot fixtures brings concentrated-beam options together in one place, so it is easier to compare models and keep trims, switches, and accessories aligned for installation.
Beam Angle and Optics: The Difference Between Spotlight and Spill
Beam angle is the single specification most responsible for whether light feels focused. A narrow beam, often in the 10 to 25 degree range, creates a tight pool of light with dramatic emphasis and higher apparent intensity at the center. A medium beam, roughly 25 to 40 degrees, is a common choice for art, shelving, and general accenting because it offers definition without turning every highlight into a flashlight effect. Wider beams, around 40 degrees and above, begin to behave more like floodlighting and can wash walls more evenly, especially when the fixture is set back or mounted higher. Reading the beam angle is not optional if you want predictable results.
Optics matter because two fixtures with the same beam angle can still look different on the wall. Lens quality affects how clean the beam edge appears and whether you see stray rings, hot spots, or uneven gradients. Reflector design determines how much spill light escapes outside the intended cone, which is especially important in galleries, hallways, and bedrooms where glare can be distracting. Higher-quality spot lights tend to produce a smooth center with controlled falloff, which looks intentional and reduces eye strain. If you have ever seen a spotlight that creates an odd bullseye pattern, that is usually an optical design issue rather than a placement mistake.
Distance completes the picture, because beam angle interacts with mounting height. A narrow beam from a high ceiling can still spread wider than you expect, while the same beam from a short track run can create an overly tight and harsh circle. A useful way to think about it is that the beam behaves like a cone that widens with distance, and your job is to decide where that cone should land. In practice, you can map it with painter’s tape on the floor or wall, then adjust aim before you commit to final tightening. Good installers treat aiming as part of the process, not as an afterthought.
Brightness and Distribution: Lumens, Candela, and Real-World Perception
Consumers often fixate on lumens, but focused illumination is about intensity where it lands. Lumens tell you the total light output, while candela describes the intensity in a particular direction, which is what makes a spotlight read as punchy. A lower-lumen lamp with higher candela can outperform a higher-lumen lamp with a diffuse distribution if your goal is to highlight an object. This is why some “bright” bulbs disappoint when used as spot lights, because their output is spread too widely. Understanding that distinction prevents overbuying and keeps spaces comfortable.
The surface you are lighting changes perception more than most people expect. Matte paint absorbs more light and reduces sparkle, while glossy finishes reflect and can create glare. Dark wood, brick, and textured stone often require either more intensity or a slightly wider beam to avoid the look of patchy illumination. Artwork behind glass is notorious for catching reflections, so the right answer is frequently a better angle rather than brute brightness. The goal is not to make everything brighter, but to make the focal area look deliberate and visually clean.
Dimming is the practical hedge against miscalculation. A spotlight that is slightly too strong can usually be tamed with a good dimmer, while a spotlight that is too weak cannot be rescued without swapping hardware. When you plan a space, choose a fixture and driver combination that supports smooth dimming without flicker, sudden jumps, or hum. Many homeowners discover compatibility issues only after installation, so it is worth checking whether the lamp is rated for the dimming method in use. In focused lighting, dimming is not just mood control; it is calibration.
Color Temperature and CRI: Making Highlights Look Natural
Color temperature determines whether a spotlight feels warm and residential or cool and crisp. Warm options, typically around 2700K to 3000K, flatter skin tones, wood finishes, and living spaces where comfort matters. Neutral options near 3500K can work well in kitchens and hallways where you want clarity without a clinical tone. Cooler options, around 4000K and above, can appear sharper and may be useful in workspaces, but they can make homes feel less inviting. The best choice usually matches the room’s ambient lighting so the spotlight does not look like it belongs somewhere else.
Color rendering is the technical factor that often separates “fine” lighting from lighting that makes the room look expensive. CRI, or Color Rendering Index, describes how accurately a light source reveals colors compared with a reference source. For art, retail, makeup areas, and kitchens where food should look appetizing, higher CRI is a practical requirement rather than a detail for enthusiasts. Lower CRI lighting can make reds dull, greens muddy, and skin tones slightly off, which is subtle until it is the only thing you can see. A spotlight’s job is to draw attention, so any color distortion gets amplified.
Consistency across fixtures matters just as much as the number on the box. If one spotlight is warmer than another, your ceiling can look patchy and your focal wall can appear uneven. Better manufacturers control color variation more tightly, which becomes important when you install several units on a track or in a row. This is also why mixing bulbs from different brands, even at the same listed color temperature, can yield mismatched results. If you want a cohesive look, treat color temperature and CRI as system choices, not one-off decisions.
Fixture Types and Placement: Recessed, Track, Surface, and Adjustable Options
Fixture style determines how flexible your lighting can be after installation. Recessed adjustable spots are popular because they keep ceilings clean while still allowing you to aim the beam. Track systems are favored in spaces that change, like galleries, retail stores, and homes where art gets rotated, because heads can be repositioned without cutting new holes. Surface-mounted spots can be a smart compromise when recessing is impractical, such as in concrete ceilings or settings where minimal alteration is preferred. Each format can deliver focused illumination, but the experience of aiming and modifying it is not the same.
Placement is where theory becomes architecture. For artwork, a common approach is to aim the beam so it hits the wall at an angle that avoids glare, rather than pointing straight on. For shelves and displays, you want to avoid casting shadows from the items themselves, which may require multiple heads or a slightly different aiming strategy. For task areas, you aim to light the work surface without putting the beam directly in a seated person’s line of sight. The difference between amateur and professional results is often just a few degrees of aim and a few inches of placement.
Adjustability is the feature that saves projects. Gimbal designs, swiveling heads, and interchangeable lenses allow you to refine the result after you see it in the real room with real furniture and real wall colors. If you are lighting something visually important, such as a statement wall or a piece of art you care about, buying adjustability is usually cheaper than buying replacements later. Accessories like glare shields and honeycomb louvers can further reduce visual discomfort, especially in bedrooms and corridors. Focused illumination should guide attention, not announce itself with glare.
Efficiency, Heat, and Longevity: Hidden Costs That Show Up Later
LED spot lights are efficient, but efficiency is more than a smaller electric bill. Reduced heat matters in practical ways, especially in tight housings or near materials that can discolor over time. In recessed installations, heat management affects longevity because high temperatures can shorten driver life and cause early dimming or color shift. In display lighting, lower heat reduces stress on sensitive items like textiles, prints, and wood finishes. These are benefits you feel over years rather than days, which is why they are easy to overlook.
Rated life numbers are useful, but they should be read with a businesslike skepticism. “Hours” are measured under specific conditions, and real homes may cycle lights on and off frequently, which can stress electronics. Drivers, not LEDs, are often the first component to fail, and driver quality is not always obvious from product photos. If the spot lights will be used daily, prioritize products designed for thermal stability and intended duty cycles. A spotlight over a kitchen island is not decorative; it is work equipment.
Maintenance is also part of the decision. If your ceiling is high or your fixtures are hard to reach, a long-lasting integrated LED can be a relief, but replacement may require swapping the entire unit. Replaceable-lamp systems offer flexibility, but they can tempt people into mixing bulb types and color temperatures over time. Neither approach is universally better, but each carries a cost profile that shows up later. Choosing the right spotlight includes choosing how you want to maintain it.
Compatibility and Controls: Dimmers, Drivers, Smart Systems, and Flicker
A spotlight is only as good as its control system. Dimming can transform focused light from theatrical to refined, but it also exposes weaknesses like flicker, limited dimming range, or sudden shutoff at low levels. Compatibility depends on the lamp’s electronics and the dimmer technology, and not every combination behaves well together. If you are upgrading older switches, you may need a modern LED-rated dimmer to get smooth performance. A polished result often comes down to this unglamorous pairing of parts.
Smart controls add convenience, but they introduce another layer of decision-making. Some systems dim by cutting power at the switch, while others rely on a driver and communicate digitally. If you want scenes, schedules, or voice control, choose a platform and confirm the fixtures are designed to work within it. Otherwise, the system becomes a chain of compromises, where the spotlight’s beam is excellent but the daily usability is frustrating. Lighting is used constantly, which means small annoyances become large over time.
Flicker deserves special attention because it affects comfort and, for some people, headaches and fatigue. Flicker can be visible on cameras, but it can also be subtle enough to register as discomfort without being obvious. Better drivers and proper dimming design reduce these risks. If you are lighting a desk, a vanity, or any space where people spend time, prioritize stable output. Focused illumination is meant to sharpen what you see, not undermine it.
A Practical Buying Checklist for LED Spot Lights
A good decision process starts with a short list of nonnegotiables. Define the target, such as art, shelving, or task surfaces, then choose a beam angle that fits the size and distance. Decide on a color temperature that matches the room, and prioritize high color rendering if the spotlight will land on faces, food, or art. Select a fixture type that fits your ceiling and provides enough adjustability to fine-tune the result. Confirm dimming and control compatibility before you buy multiples, not after the ladder is back in the garage.
It also helps to anticipate what will change. If you expect to move furniture, rotate art, or remodel, flexibility matters more than squeezing out the last dollar of savings. Track systems and adjustable heads age well in that sense because they can evolve with the room. If the layout is stable and you value minimal visual clutter, recessed adjustable fixtures can look more seamless. In either case, you want consistency across fixtures so the lighting reads as coherent rather than improvised.
The last step is to test in the real environment if you can. Even careful planning cannot fully predict how a wall color, a framed print, or a glossy countertop will respond to a beam. Consider installing one fixture first or testing with a single lamp before committing to a full set. That approach may feel cautious, but it is cheaper than rework. Focused illumination rewards patience, and LED spot lights are at their best when you treat them like precision tools rather than interchangeable bulbs.