Approximately 60 percent of the basements experience moisture issues, and you are not alone in handling the problem. The positive is that given the correct planning, you will be able to establish a dry, healthy base on which to build your remodel that will not break down in years to come.
The Reason Why Your Basement is Damp.
You have to determine the source of that moisture before you get a sledgehammer or begin scraping away paint colors. Basements become damp because of various causes and knowing the cause will help you determine how to correct it.
The water may be leaking through foundation walls externally, pushing through hairline cracks in case of heavy rain or snowmelt. Sometimes the groundwater accumulates under your basement floor, and that is the reason why you always feel that dampness that you cannot shake off. At other occasions, it is condensation which occurs when warm and damp air collides with cold basement walls. And we can never omit the old stand-by of leaky pipes, run-down gutters or downspouts that pour the water right up against your foundation rather than carrying it away.
Moisture Problems Testing.
Here is a little trick which is nearly free, and tells you a good deal. Get some aluminum foil and ducting tapes in your garage. Take a few pieces of foil, 12×12 inches each and stick them well on the walls and floor of your basement, ensuring that the edges are all closed. Wait 24 hours, and peel them off and have a look.
When there is moisture on the outside of the foil, then there is humidity in the air condensing on the surfaces, which can usually be cured by a good dehumidifier. However, when moisture appears on the inside of the foil, in between the foil and the wall that is water leaking through your foundation and then you will require more serious waterproofing interventions.
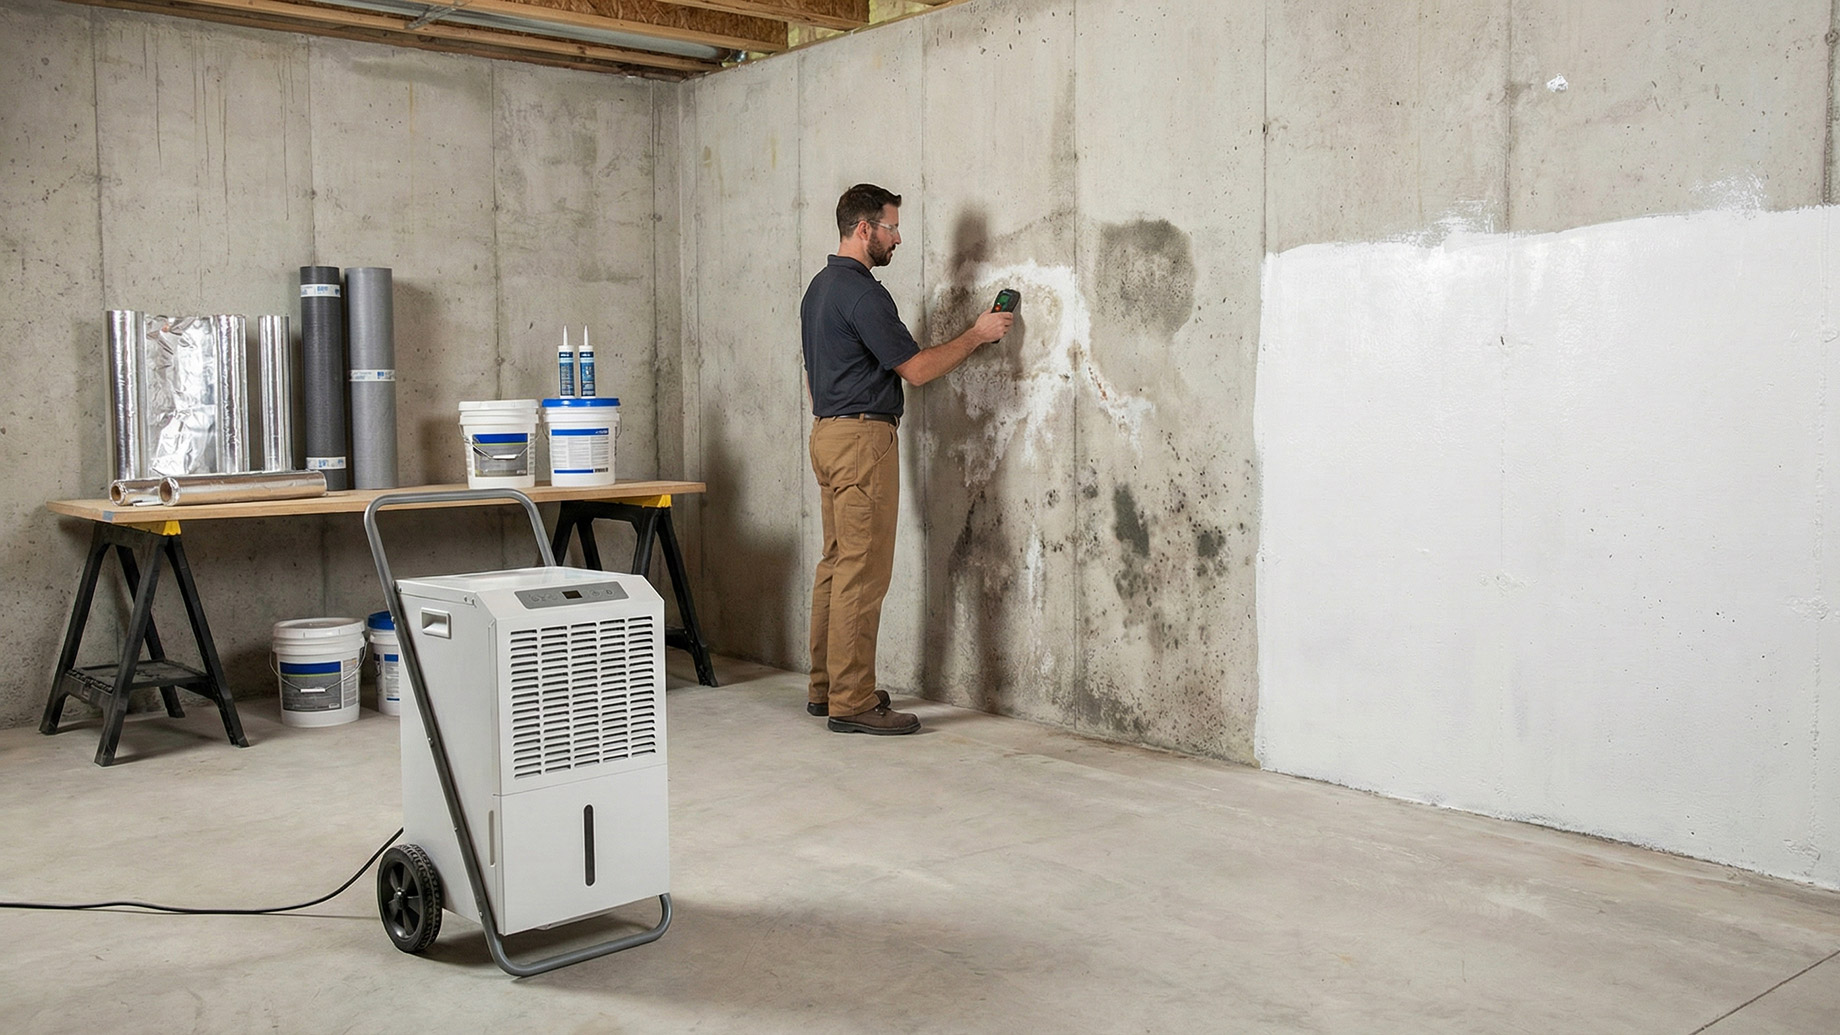
You may also like to invest in a moisture meter which is available in any hardware store. Go around in your basement and feel various spaces, particularly corners, floor corners, and places where you have noticed discolouring or smell of mustiness.
Examining Exterior Water Problems First.
The best method of preventing water entry is by preventing it before it has entered your foundation. Begin by going out around your house and inspecting your gutters. And the last time you cleaned them was when? The blocked gutters burst and start pouring water right beside your foundation which is the last thing you want.
Ensure that your downspouts are at least six feet extended away from your house. Otherwise, put downspout extensions on, they cost nothing and can make a great difference. Note the grading about your foundation, as well. Your ground should slope downwards and not upwards towards the house. When the water collects around your basement walls after it rains, there is a possibility that you may have to regrade or add soil to provide adequate drainage.
In the case of more serious foundation problems, exterior waterproofing will entail excavation around your foundation and putting on a waterproof coating on the outer surface of the walls. Yes, it is costly and disruptive, but it is also the gold standard in keeping water out since it solves the issue at its source.
Interior Waterproofing Solutions.
You do not always need to excavate your yard to solve a moisture problem. The use of interior waterproofing can be very efficient particularly when dealing with water that has already found its way in.
Begin by checking your foundation to see whether it has cracks or not. Polyurethane caulk may be used to fill hairline cracks, but bigger cracks require hydraulic cement or water-stop compound. These are materials that are specifically meant to close the cracks even in the presence of moisture. To provide an added security, put a waterproofing masonry sealer on the interior side of your basement wall.
In case of the ground water as your major concern, then installation of an interior perimeter drainage system can be considered. This is done by cutting a trench on the bottom of your foundation walls, laying a perforated pipe that is encircled by gravel and forcing the water into a sump pump that forces the water away from your house. It sounds much like a huge project, and it is but it is extremely efficient at controlling hydrostatic pressure and making your basement dry.
Prevention of Mold Before Construction.
In case the basement has been moist over some time, there is a fair likelihood that mold may have already begun to grow. This has to be taken care of before you move with any basement renovation. Mold is not only ugly, but it is a health risk, particularly to individuals with respiratory problems or allergies.
Inspect all of your basement walls, floors and ceilings, looking closely to check on any discoloured areas, fuzzy areas, and water spots. Look behind the objects stored, round piping and in unexposed areas like corners and where air does not circulate well. In case you notice anything suspicious, you could make a basic test by adding one part bleach to ten parts water, dipping a cotton swab in the mixture, and running it over the substance, in this case, as long as it lightens, it is not mold.
In the case of small molds, you may be in a position to clean it yourself using the right safety gear. However, in case the area involved is huge, or when you have a lot of water damage involved, it is worth inviting professionals like mold removal services Bellevue to the task of removing mold and other places. They possess the necessary equipment and experience to determine the presence of hidden mold through the application of moisture meters and thermal images and make sure that the issue is fully addressed prior to the commencement of construction.
Installation of Dehumidifier System.
Although once you are done sealing cracks and waterproofing your basement, humidity control is the major factor to success in the long-run. The humidity of basements is naturally greater due to the lower temperature of the basement coupled with the temperature gradient which produces condensation.
A good dehumidifier that has been installed in the basement area will be able to eliminate moisture in the air at all times keeping away mold, mildew and the damp smell that makes the basement uncomfortable. Find models that are rated by the size of your basement- some are rated to 2,600 square feet. The investment is not only worthwhile, but also it saves your finished space against moisture damage in the future.
Remember that a dehumidifier is a treatment of the symptom not the cause. In case of active seepage or leaks of water, you should repair them. However, when your basement is sealed correctly, a dehumidifier will help to keep the right amount of humidity and will provide the best opportunity for your basement remodeling to remain beautiful in the years to come.
The Bottom Line
Remodeling a damp basement is not the most glamorous thing to do in the project, however, this is the most important. It is just like putting paint on rust, it may be painted well but the original problems will come up again and the paint will incur more costly damages.
You can work out what the sources of moisture are, repair them correctly, and make a really dry environment. Check the presence of mold and eliminate any problem prior to framing one wall. Invest in the waterproofing, exterior, interior or both depending on your particular situation. And, by the way, it is much cheaper to do this preparation work right than to remove and remodel a ruined basement a few years later on.